Chainfire 3D Pro For Android Play HD Games On Your Android

Add Comment

Take control over your GPU!
Chainfire3D is an intermediary OpenGL driver. What does that mean? It means that Chainfire3D sits between your apps and the graphics drivers, and can intercept and/or change commands between the two. It has some built-in functions, and can be further extended with plugins to provide extra functionality.
!! For Froyo and Gingerbread ONLY. NOT COMPATIBLE with Honeycomb/Ice Cream Sandwich/Jelly Bean !!
!! Chainfire3D is for 1ghz+ devices only !!
!! ROOT is required for this program, as well as a writable /system partition. S-OFF is also required on HTC devices !!
Features include reducing texture size and quality to reduce memory use and potentially increase game performance, as well as increasing memory use potentially increase performance.
If you also install the (experimental) EGL driver, AND your GPU supports it, AND you have the Pro version, you can enable 4xMSAA or 16xMSAA on a per-app bases. This can drastically improve image quality!

Link Download


How to Root Samsung Galaxy S3 I9300

Add Comment
Guide to root samsung galaxy s3


For all those users of Galaxy S3 GT I9300 who have updated with the latest version of Official Jellybean 4.3 which is XXUGMK7 can now update can now root the device following simple instructions which we will be checking out in the due course of this article. So after checking out on what are the quick list of pre requisites which we have summed up below, we will be heading over to the detailed guide which will help you root the device. Once you root the device, you can then install many custom ROM firmwares

Quick Pre Requisites:


All the data in your Galaxy S3 should be backed up with the help of below mentioned steps and not with KIES tool as
  • SMS – Use “SMS Backup & Restore app”,
  • Contacts – Sync with the Gmail or try  This,
  • Images, Songs, Videos, Files – Copy to internal / External SD Card,
  • APN and MMS Settings – Note down from the path “Applications > Settings > Wireless and Network > Mobile Networks > Access Point Names” 
  • Enable the USB Debugging Mode in your computer from the path “Settings > Applications > Development > USB debugging”. Also, the minimum battery life should be a minimum of 40% or else there is a risk of device getting turned Off in the middle of firmware update.

Disclaimer: We should not be held responsible or liable in any manner for any damage caused to the device. Also, make sure that this firmware is not applied to the Network Locked Devices.

Once you are done with the above mentioned steps, you can then head over to the next step where we have mentioned the detailed guide which will help you root the device.

Procedure to Root Galaxy S3 on XXUGMK7 Jellybean 4.3 Android Firmware:


  1. .Download Rooting Package and Odin from here to your computer. once downloaded, extract the firmware zip package and open odin in your computer. 

  2. .Turn off your Galaxy S3 so that it will now have to be entered in the Download Mode. Download Mode. Galaxy S3 can be entered into the Download mode by holding the Volume Down button + the Home key button (the middle button). While holding these both buttons, you need to switch ON your device. 

  3. .Connect your device in Download mode with the computer in which you have opened the Odin. once conected, you will see that the ID: COM section will turn Yellow indicating that all the drivers have been installed successfully. 

  4. .Once done, click on “PDA” to choose the Rooting tar file which you got after extraction and click on “Start” to start the process of rooting. It will take around a minute for rooting the device. 

  5. .Download the “Root Checker” app from the Google PLAY Store to check on whether the device is rooted or not. Just in case if the device is not rooted, you need to retry the process of rooting. 


                    Note:     If at all your Galaxy S3 gets in the boot loop sequence then you need to turn off the device and then reapply the update from the start. To turn off you can reinsert the battery or say you can long press the power button.

                    So there you go, you have now successfully learnt on how to apply this update in your phone. 


                    More Samsung Galaxy Updates And ROM HERE

                    ARMV6 TEMPLE RUN OZ for Galaxy y,Galaxy pocket,Galaxy ACE

                    Add Comment

                    [[PORTED]] ARMV6 TEMPLE RUN OZ

                    size:25.89mb
                    os requirements:2.2-up

                    Description
                    The most thrilling running experience now comes to the yellow brick road! Reached No. 1 across the globe within hours of launch! Check out all-new China Girl, and see what critics are saying about Temple Run: Oz – • “My favorite Temple Run game to date.” – TouchArcade
                    • “Lush environments, a tried-and-true game mechanic, and unique new worlds and mini-games that differentiate it from other Temple Run games.” – CNET
                    • “Prettier, faster, sleeker, and unafraid to go off the beaten path for a relaxing balloon ride.” – Kotaku
                    Disney and Imangi Studios present Temple Run: Oz – a brand-new endless runner inspired by Temple Run 2 and the film Oz the Great and Powerful. Play as Oz and outrun the shrieking flying baboons as you turn, jump and slide your way across the land. Begin your exhilarating adventure now and see how far you can run!
                    NEW FEATURES
                    • Run as China Girl and see Oz in different costumes – change it up!
                    • Stunning environments inspired by the film – explore them all.
                    • Fly in a hot air balloon – earn even more coins.
                    • Explore different locations in Oz – follow sign posts or use ‘head start’ feature!
                    • The environment changes as you run – test your reflexes.
                    • Compete in weekly challenges & leaderboards – beat your friends!
                    BONUS! Get 1500 coins for FREE when you download Temple Run: Oz today – that’s $.99 USD worth of coins to buy power-ups and more!

                    :
                    link


                    DOWNLOAD

                    if you can't play or lag while play,you can use "chainfire3d" ;)
                    PES 2013 for ARMv6 and ARMv7 devices

                    PES 2013 for ARMv6 and ARMv7 devices

                    Add Comment
                    PES 2013 ISO RIP Version ( PSP ) Android ARMv6 ARMv7


                    Requires : Android 2.2 And Up
                    Device : Armv6 & Armv7 Android Device

                    Dєѕ¢яιρтιση : 

                    This Pro Evolution Soccer 2013 Is a PSP Game
                    And Now You Can Play This Game On Your Android Phone
                    Now With a PSP Emulator For Android
                    And Emulator Can Be Downloaded Free At Google Play

                    Download ISO File : Click Here To Download 

                    Mirror: Here

                    NOTE = If the above download link does not open then press 


                    Instruction : 
                    1. Download Rar File, And Extrac To Your SD Card
                    2. Download Lastest Build PSP Emulator For Android From Here
                            Click Here To Download
                    3. Instal & Open
                    4. And Then Load ISO File And Play The Game

                    Screenshot :


                    How to Root and Unroot Galaxy Mini 2

                    Add Comment
                    Rooting Guide

                    Disclaimer: Im not responsible for the possible bricking your handset,(still no case of brick). and the rooting process will void your warranty.
                    This rooting guide is exclussively for all variants of S6500 namely S6500D, S6500L and S6500T.

                    Needed:
                    Samsung KIES (Kindly Download at Samsungs' website or just Google it)
                    ODIN3: Click Here
                    or ODIN 1.85 Click Here
                    CWM recovery: Click Here
                    Root.zip: Click Here
                    Unroot.zip: Click Here
                    OC(Only) Kernel: Click Here

                    Note 1: Make sure you already have KIES installed for the drivers. If not, google Samsung KIES and install it.

                    Note 2: Place the root.zip to your externalSDcard(micro SD) or sd card(built in memory on phone)

                    (Make Samsung KIES is CLOSED and in the task manager so we can run Odin)

                    1. Turn off the phone and boot the phone in download mode (volume down + home + power) Press volume up to enter download mode.

                    2. Run Odin.

                    3. Plug phone to PC and wait for Odin to detect it.

                    4. Click PDA and choose the CMW recovery file.

                    4.1 FLASHING PART

                    Click PDA and choose the FIRMWARE you downloaded at SamFirmware.

                    After Steps 1 to 4 it must look like this:


                    5. Click START and wait till Odin prompts PASS and reboots your phone.


                    6. Turn of the phone again and boot on CWM recovery mode (power + home + volume up + volume down simultaneously until the SAMSUNG logo appear)

                    7. --7.1 ROOTING PART
                    Use the volume keys to navigate on the CWM UI. choose install zip form sdcard (or external sd card) and press the home button to enter selection , then locate the root.zip.

                    7.2 OC PART
                    Use the volume keys to navigate on the CWM UI. choose install zip form sdcard (or external sd card) and press the home button to enter selection , then locate the updatejenaboot.1.1.zip.
                    (take note that the september 2012 (DZSLI2) above build of has wifi issues at OC kernel
                    dialing *#*#232339#*#* "MAY" solve the conflict)

                    7.3 UNROOTING PART
                    Use the volume keys to navigate on the CWM UI. choose install zip form sdcard (or external sd card) and press the home button to enter selection , then locate the unroot.zip.
                    (for me its better just to flash a new firmware than doing this)


                    8. Select Reboot phone


                    Note3: You might be curious of the Yellow Triangle on the boot screen of Samsung
                    this is normal as S6500(D) have a Custom Binary Counter. However this also means that your on the
                    right track for rooting your phone

                    Your Samsung Galaxy S6500(D) is now rooted!.
                    To confirm, you mast see a "SuperUser" app


                    Note 4:For OC'ing just download a 3rd party app at the playstore (e.g. No-frills Cpu, Set-CPU)
                    DZSLI2 (September 2012 build; HONGKONG) firmware have wifi problems when OC kernelbe applied.
                    posible fix for this is to enter *#*#232339#*#* at the dialer.


                    Tested on almost all firmwares

                    Steps To Root and Unroot Your Android

                    Add Comment
                    Steps To How To Root and Unroot, And Features of rooting :)
                    Guide to root samsung galaxy s3
                    What is "Rooting?"

                    The Android phone that you have learned to love and enjoy is running an operating system that was designed for commercial and private use. Like most any operating system, several features have been disabled, either for future use or to prevent the casual user from causing permanent damage to the operating system. "Rooting" is the process in which the limitations are removed and full-access is allowed. Once rooted, the Android phone owner will have more control over many settings, features and performance of their phone. Basically, "rooting" means to get to the root of the operating system and to have the ability to make global changes.

                    Advantages-

                    "Rooting" your Android phone does afford you numerous benefits, including;

                    1.Running special applications-Superuser is an app that can only be run on a rooted Android phone. This allows you to control which apps have access to the "root" system. Another popular application that "rooting" affords is the ability to tether a computer to your Android phone so that the computer can access the Internet using the phone's data connection. Another program can allow your Android to be used as a WiFi Hotspot without having to pay your provider for the feature.
                    2.Freeing up memory-When you install an app on your phone, it is stored on the phone's memory. "Rooting" allows you to move installed applications to your SD card, thus freeing up system memory for additional files or apps.
                    3.Custom ROM's-This is the most powerful feature of "rooted" phones. There are hundreds of custom ROM's that can do anything from speeding up the processing speed of your phone to changing the entire look and feel of your phone.
                    Disadvantages Of Rooting your phone
                    1.Rooting immediately voids your phone's warranty-Once rooted, don't try to bring your phone back for service or warranty work. You are on your own!
                    2.Rooting involves the risk of "bricking" your phone-In essence, a "bricked" phone is no better than carrying around a brick in your pocket. The phone is dead when it has been "bricked.

                    Other potential disadvantages, though less severe, are still worthy of consideration;

                    1.Poor performance-Though the intention of "rooting" a phone is to give the phone more performance, several users have found that, in their attempts to speed up the phone or add additional features, that their phones lost both performance speed and features. Remember that when you "root" your Android phone, you are making changes to the stock operating system.
                    2.Viruses-Yes, even phones can get viruses. A common practice that people do with "rooted" phones is to flash their ROM's with custom programs. Whenever you make changes to the code of a software, you run the risk of introducing a virus."
                    So if You are not careful with your phone Don't root it 

                    Disadvantages-

                    There are two main disadvantages to rooting and Android phone;
                    Rooting immediately voids your phone's warranty-Once rooted, don't try to bring your phone back for service or warranty work.  You are on your own!
                    Rooting involves the risk of "bricking" your phone-In essence, a "bricked" phone is no better than carrying around a brick in your pocket. The phone is dead when it has been "bricked."


                    LETS BEGIN! 

                    Rooting:

                    Download Root.Zip (Root)To Your Computer Then put it on your sd card
                    Shut down your phone
                    Put It on recovery mode by pressing volume up, Power button and Home button(you cannot use touchscreen on recovery mode, use up and down volume button to navigate and home button to select)
                    select apply update from sd card and select your Root.Zip .
                    Reboot Your Phone
                    WALAH!! YOU HAVE ROOTEN YOUR PHONE!!  Congratulations

                    Unrooting:

                    download unroot.zip (UNROOT)to Your Computer Then put it on your sd card
                    Shut down your phone
                    Put It on recovery mode by pressing volume up, Power button and Home button
                    select apply update from sd card and select Unroot.Zip
                    Reboot Your phone
                    YOU HAVE JUST UNROOT YOUR PHONE 

                    COMMENT IF I HELPED  ^_^


                    DOwnload ROOT file and UNROOT file from Here
                    SuperNexus Android 4.3 Jelly Been ROM FOR Samsung Galaxy S

                    SuperNexus Android 4.3 Jelly Been ROM FOR Samsung Galaxy S

                    1 Comment
                    The main idea behind SuperNexus is to provide Vanilla Android experience, just like on Google's 
                    Nexus devices, to non-nexus devices. SuperNexus is entirely built from Google's AOSP Source. A lot of improvements and optimizations have been done to the Google's Source Code to have the best possible 
                    Vanilla Android Experience. SuperNexus is very light too as there are no 3rd party apps (ZERO Bloatware).

                    System Details:

                    • Android 4.3 Jelly Bean (JSS15J - Android-4.3_r2.1)
                    • Latest CM Kernel
                    • All Jelly Bean Features and Apps (Nothing excluded from AOSP)
                    • No Visual Changes!
                    • Stock Jelly Bean Look and Feel
                    • This will turn your Samsung Galaxy S III into a Nexus 4 


                    ROM Features:

                    • Fully Deodexed
                    • Zipaligned APKs
                    • Rooted (Super SU)
                    • BusyBox Installed
                    • No 3rd Party App
                    • ZERO Bloatware
                    • Android Source Code vastly improved and optimized (i.e. Bionic, Dalvik, Webkit, Framework, 
                    • libcore, SQlite etc)
                    • Official JellyBean bootanimation
                    • Init.d Support
                    • Rsync Support
                    • UserInit Support
                    • Bash & Nano Support
                    • Native SIP/VOIP Support
                    • OpenSSH Support (ssh, sshd, scp, stfp)
                    • HSPA+ Support
                    • OpenVPN Support
                    • Ad-Hoc Network Support
                    • exFAT and NTFS-3G support
                    • EXT4 File System Optimizations
                    • Large APN & SPN List
                    • SELinux enabled
                    • Framework Features:
                      -Extended Power Menu (Reboot, Recovery, Download & Screenshot Options)
                      -Improved Scrolling Cache
                      -Tweaked Animation Values Of Progress Spinners (Silky Smooth Loading Spinners)
                      -Enabled Rotation Lock Tile in Quick Settings for Phones (Previously was only enabled on Tablets)
                      -Increased Lockscreen Widget limit from 5 to 9
                      -Options for switching between USB Mass Storage and MTP/PTP (On Specific Devices)
                    • Browser Features:-
                      -Increased Maximum Tab limit from 16 to 64
                      -Incognito Tab Option (When long pressed on an URL)
                      -Option To Close All Tabs With One-Click
                      -Allowed Any Type Of File To Be Downloaded
                      -HTML5 WebSockets
                    • Phone Features:-
                      -Noise Suppression
                    • Miscellaneous Features:
                      -Allowed Installation Of Apps From Unknown Sources By Default
                      -Disabled Data Roaming By Default
                      -Dialer auto-complete enabled by default (Stock T9 dialer)
                      -Removed Google's Software Updates Option from Settings
                      -Enabled Gesture Input By default
                      -Hardware Information of the device (Settings>About Device>Hardware Information)


                    Download's:


                    Google Apps:


                    ScreenShot's


                    Instructions

                    First time installing SuperNexus 3.0 to your device, or coming from another ROM:
                    - Copy Google Apps and SuperNexus ROM into your internal SD Card
                    - Boot into Recovery (Volume up + Home + Power)
                    - DO A DATA WIPE / FACTORY RESET (otherwise your device will be stuck at boot)
                    - Flash SuperNexus ROM
                    - Flash Google Apps' package
                    - Reboot your device

                    Upgrading from earlier build of SuperNexus 3.0:
                    - Copy Google Apps and SuperNexus ROM to your internal SD Card
                    - Boot into Recovery(Volume up + Home + Power)
                    - Wipe Cache
                    - Wipe Dalvik-cache (Under Avanced -> Wipe Dalvik-Cache)
                    - Flash SuperNexus ROM
                    - Flash Google Apps' package
                    - Reboot your device.
                    Guide to Root Sony Xperia Z

                    Guide to Root Sony Xperia Z

                    1 Comment
                    Sony Xperia Z C6602 & C6603 android mobile is now root with this guide. After rooting your phone you can install custom ROM’s, Custom Recovery and Some other apps that need a root access. Some people don’t know about the meaning for rooting, here is it. It allows other files or data from third party to access the system files. This will give the function to do customization of user interface, some apps which also comes in Custom ROM. Here is the guide to Root theSony Xperia Z C6602 & C6603.


                    The Sony Xperia Z is comes with Android 4.1.2 Jelly Bean as an operating system by default. The phone is comes with 13.1 Mega Pixel Primary Camera eith LED Flash and 2.2 Mega Pixel Secondary Camera. The Phone have 16 GB of Internal Storage and there is a card slot that supports 32GB of Micro SD. The phone also comes with 2GB of RAM which is helps to work much quicker. The phone is one of the best android smartphone compared with other mobiles which is coming with the same 1.5GHz Qualcomm Quad core processor. The phone have the biggest feature of Camera.
                    Root Sony Xperia Z

                    Warning Before rooting Sony Xperia Z C6603 and C6603:

                    • We are not responsible for any damages that may happened due to using this guide to root your phone. If any problem that related to rooting instructions, we will help you to solve it.
                    • Rooting is void your warranty of your phone.
                    • Use this guide at your own risk. We shall not have any liability or responsibility for whatever happens to you and your device by using the instructions in this guide.
                    • The instructions provided in this tutorial for educational purpose only. There is no guarantee that these steps will work for your device.
                    • The steps given in this tutorial is only to use with Sony Xperia Z and the model number isC6602 & C6603. Applying this guide to any other device or any other model may produce many problems.
                    • Read and Understand the whole tutorial first, before going to perform the steps.

                    Pre Requirements to Root Sony Xperia Z C6602 & C6603:

                    • A Windows PC or Laptop.
                    • Install the USB Drivers for your PC to Connect the mobile.
                    • We recommend you to take a backup of your data in the mobile using PC suite or any other method. After rooting, the data won’t be deleted. In case if you miss some data you can restore it from the backup file.
                    • SMS – Backup Messages
                    • Contacts – Sync with Gmail App
                    • Videos, Images, Songs and Other Files – Copy to internal / External SD card or System
                    • APN Settings – Take Manual Note from “Settings > Wireless & Networks > Mobile Networks > Access Point Names
                    • Then maintain minimum 60% charge in your mobile’s battery. This will help your device to don’t get switched off.
                    • And Enable USB Debugging – “Settings > Developer Settings> USB Debugging”
                    • Then Disable any antiviruses and firewalls in your PC or Laptop. Because these tools may interrupts the process during the rooting.

                    Downloadable files to Root Sony Xperia Z:

                    The following files are need to perform the process in the guide. So, download the following files one by one. And make sure that you have downloaded all the files. If the following download links were broken. Inform us to re post the download files.
                    • Modified Kernel – Z_DooMLoRD_CF-Auto-Root-ported_FW-350.img – Here
                    • Insecure Kernel – Z_DooMLoRD_insecure_FW-350.img – Here
                    • Fastboot – Here

                    How to Root Sony Xperia Z:

                    • Make sure you have unlocked the bootloader.
                    • You need to place the downloaded files in the Desktop.
                    • Extract the downloaded files.
                    • Turn off the phone.
                    • Press and hold the VOLUME UP key and connect the phone to PC using original USB Data Cable that you got it when you bought the phone. Using other cables may produce not detecting problems. So, only we recommend to use it.
                    • Open the Command prompt on your Desktop. To do that, Just press and hold the SHIFT button and right click on the empty space then choose “Open Command Window Here”
                    • Now Command window will open. Then type the following and press enter.
                    fastboot flash boot Z_DooMLoRD_CF-Auto-Root-ported_FW-350.img
                    • After the above executed, type the following and press and enter.
                    fastboot reboot
                    • Your device will be re booted.
                    • After rebooting started, just remove the cable from PC.
                    • Now you need to hard POWER OFF the device. For that, press and hold the POWER button and VOLUME UP for about 15 seconds.
                    • Now open your phone in Fastboot mode. For that, Press VOLUME UP and connect the phone to PC.
                    • Then again open command prompt in Desktop. Do the same, press SHIFT button and right click on empty space in desktop and choose “Open Command window Here”.
                    • Then enter the following command and press enter
                    fastboot flash boot Z_DooMLoRD_insecure_FW-350.img
                    • After that enter the following command and press enter
                    fastboot reboot
                    • Then your device will re boots again.
                    • After that disconnect the phone from PC.
                    • Then go to Google Play store then download and install the BUSY Box.
                    • If your phone has stuck on the welcome screen or boot screen, just remove the battery and re insert it and do the above steps again.
                    • If you want to check whether your phone has rooted or not, search Root Checker app in Google Play store and install it. Then open it and you can find it your phone rooted or not rooted. Or check your mobile’s app list. Super User app has been installed on your phone. If the Super User app is not there in your phone your mobile doesn’t rooted successfully.

                    Lucid Launcher For Android Free Download

                    Add Comment
                    Play Store description

                    Lucid launcher is a home screen replacement app created entirely from scratch. This launcher is designed to be light, fast, and customizable. This app is in alpha mode so keep in mind many features are to be added in the future. Tell me what you think about the launcher and give suggestions.

                    SOME FEATURES:
                    *Unlimited widgets
                    *Favorites sidebar (with intro animation)
                    *Search-bar
                    *Many customization settings
                    *Web Browser inside launcher
                    *separate landscape and portrait home page layouts


                    Screenshots:


                    Download -

                    Download from the Play Store HERE

                    Download APK: HERE

                    CM7.2 Reincarnation ROM (Touchwiz) For Samsung Galaxy Ace S5830i

                    20 Comments


                    CM7.2 Reincarnation ROM Series v.5 | Touchwiz Nature UX Edition

                    Android CM7.2 Reincarnation ROM ROM for Samsung Galaxy ACE S5830i is now available to update your mobile. The Android CM7.2 Reincarnation ROM for Samsung Galaxy ACE S5830i is from CyanogenMod developers. And it includes all the new features in the latest version. You can upgrade your phone to Android 4.2 Jelly Bean Operating System by installing this custom ROM. Be aware before processing this tutorial that this is not an official update from Samsung. This is a custom ROM from CyanogenMod. So, all credits goes to the CyanogenMod Team. Here is a guide to update your Samsung Samsung Galaxy ACE S5830i to Android CM7.2 Reincarnation ROM.

                    With Aroma Installer, this rom give your customization


                    1. Select your Statusbar style. (Gradient/Transparent/Normal)
                    2. Select your GPS continent
                    3. Select your GPS country, you can leave its, if your country not appearence.
                    4. Option to install In2extV2+ unofficial script tby Stryke to expand your internal storage at flashing.


                    Performance

                    1.  2.3.8 Bluetooth versions
                    2.  Reincarnation Engine v.1 (the most minimal script and will publish soon)
                    3.  Adrenaline Boost PRIME
                    4.  BLN work
                    5.  Better Battery life
                    6.  Build.prop tweaks (very clean tweaks)
                    7.  Built in flash player 11
                    8.  Camera flash fix included
                    9.  Faster GPS lock
                    10.  Full GPU rendering
                    11.  Integrated host file for adblocker
                    12.  Media profile tweaks
                    13.  Reincardio Engine, give excellent music quality and best overall audio engine
                    14.  Removed beep volume panel
                    15.  WIfi tehering really work fine
                    16.  Pre-Installed (optional) in2extv2+ script to expand your internal storage..

                    Screen Shots:

                    Launcher


                    Lock screen


                    Statusbar


                    Phone and Contacts


                    Settings


                    Music


                    My Files


                    Other


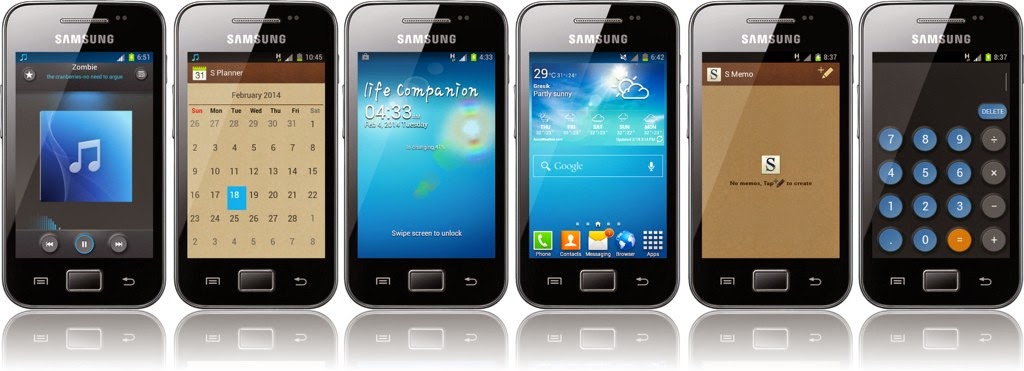
                    Features and Interface


                    1.  S4 Launcher
                    2.  S4 Lockscreen with real flare effect and sound effects,
                    3.  S4 Styled Statusbar
                    4.  Stock My files
                    5.  Stock Memo, modded and renamed to S Memo
                    6.  Stock CM Calendar modded and renamed to S Planner
                    7.  Stock CM Calculator modded
                    8.  Stock Touchwiz Desk Clock
                    9.  Stock Accuweather from Galaxy S2
                    10.  Samsung Keypad
                    11.  S4 Music player (base is MIUI Music Player)
                    12.  Quicpic gallery
                    13.  Samsung stock task manager
                    14.  Samsung digital clock widget
                    15.  Added Proximity Lockscreen
                    16.  Videos like stock samsung video app
                    17.  Beautifull CyanogenMod Lockscreen
                    18.  Added Photo Clock Widget
                    19.  Modded and Included Camera Flash fix
                    20.  2.3.8 Screenshot apps
                    21.  Android 4.x title bar
                    22.  Android 4.x notification panel
                    23.  Android 4.x window animation and transition.
                    24.  Android 4.x security lockscreen
                    25.  New Touchwiz boot animation
                    26.  29 Beauty touchwiz Wallpaper included in Launcher


                    Warning before installing ROM on Samsung Galaxy ACE :

                    • We are not responsible for any damages that may happened due to using this ROM. If any problem happens that related to installing, we will help you to solve it.
                    • Use this guide at your own risk. We shall not have any liability or responsibility for whatever happens to you and your device by using the instructions in this guide.
                    • The instructions provided in this tutorial for educational purpose only. There is no guarantee that these steps will work for your device.
                    • The steps given in this tutorial is only to use with Samsung Galaxy ACE . Applying this guide to any other device or any other model may produce many problems.
                    • Read and Understand the whole tutorial first, before going to perform the steps.

                    PRE REQUIREMENTS:

                    • We recommend you to take a backup of the data in your phone. After installing the ROM, all the files and data will be deleted. Then you can restore it from the backup file.
                    • Contacts – Sync with Gmail App
                    • Videos, Images, Songs and Other Files – Copy to internal / External SD card or System
                    • Then maintain minimum 60% charge in your phone’s battery. This will help you to don’t get switched of your phone.
                    • And disable any antivirus and firewalls too.


                    How to Install : Flash via CWM 


                    Aroma Installer Table


                    If from Stock Based Custom ROM
                    1. Flash back stock via ODIN
                    2. Root your devices
                    3. Flash CWM Recovery
                    4. Download bieltv.3 cm7.2 spesific basic kernel Go Here or Thunder kernel Go Here
                    5. Mount data, system, cache.
                    6. Flash kernel
                    7. go to advanced, and reboot recovery
                    8. Wipe Data
                    9. Wipe Cache Partitions
                    10. Wipe Dalvik Cache
                    11. Format system
                    12. Format cache
                    13. Format data
                    14. Mount system
                    15. Mount Data
                    16. Mount cache
                    17. Install Zip from SD Card
                    18. Reboot


                    If from CM7 Based ROM
                    1. Wipe Data
                    2. Wipe Cache Partitions
                    3. Wipe Dalvik Cache
                    4. Format system
                    5. Format cache
                    6. Format data
                    7. Mount system
                    8. Mount Data
                    9. Mount cache
                    10. Install Zip from SD Card
                    11. Reboot


                    Download Touchwiz ROM For Samsung Galaxy Ace S5830i :